

Add index entries
You create index entries using the Index panel in Reference mode. An index entry consists of two parts: a topic and a reference. Topics can be defined ahead of time using a topic list. References can be page numbers or cross-references to other topics.
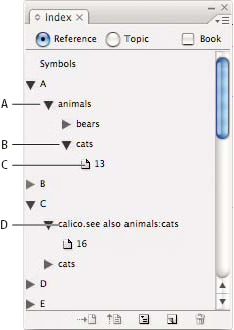
- A.
- Entry
- B.
- Subentry
- C.
- Page reference
- D.
- Cross-reference
An index marker is inserted at the beginning of the word in which text is selected or the insertion point appears. You can view index markers by choosing Type > Show Hidden Characters.
 Add an index entry
- Using the Type tool
 , place
the insertion point where you want the index marker to appear, or
select text in the document to use as the basis for an index reference.
, place
the insertion point where you want the index marker to appear, or
select text in the document to use as the basis for an index reference.
When selected text contains inline graphics or special characters, some characters (such as index markers and inline graphics) are stripped out in the Topic Level box. Other characters, such as em dashes and copyright symbols, are converted to metacharacters (for example, ^_ or ^2).
- To add text to the Topic Levels box, do any of the following:
-
To create a simple index entry (such as cats), type the entry in the first Topic Levels box. (If text was selected, that text appears in the Topic Levels box.)
-
To create entries and subentries, type the parent name (for this example, animals) in the first Topic Levels box, and type subentries (cats and Calicos) in subsequent boxes. If necessary, click the up and down arrows to change places with the item above or below the selected item.
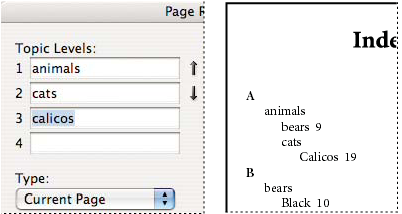 Index entry in the Topic Levels box (left) and resulting appearance in the Index (right)
-
Double-click any topic in the list box at the bottom of the dialog box.
-
Index a word, phrase, or list quickly
Using an indexing shortcut, you can quickly index individual words, a phrase, or a list of words or phrases. Adobe InDesign recognizes two indexing shortcuts: one for standard index entries; the other for proper names. The proper name shortcut creates index entries by reversing the order of a name so it is alphabetized by the last name. In this way, you can list a name with the first name first, but have it appear in the index sorted by last name. For example, the name James Paul Carter would appear in the index as Carter, James Paul.
To prepare a list for indexing, separate each item you want to be indexed with any of the following: a return, a soft return (Shift + Return key), a tab, a right-indent tab (Shift + Tab), a semicolon, or a comma. The indexing shortcut adds a marker in front of each entry and places all the items into the index.
- In the document window, select the word or words you want to index.
- Do one of the following:
-
For standard words or phrases, press Shift+Alt+Ctrl+[ (Windows) or Shift+Option+Command+[ (Mac OS).
-
For proper names that you want indexed by the last name, press Shift+Alt+Ctrl+] (Windows) or Shift+Option+Command+] (Mac OS).
An index marker using the default settings is added at the beginning of the selection or to the beginning of each item selected.
 To index compound last
names or names with a title, include one or more nonbreaking spaces
between the words. For example, if you want to index “James Paul
Carter Jr.” by “Carter” instead of “Jr.”, place a nonbreaking space
between “Carter” and “Jr.” (To insert a nonbreaking space, choose
Type > Insert White Space > Nonbreaking
Space.)
To index compound last
names or names with a title, include one or more nonbreaking spaces
between the words. For example, if you want to index “James Paul
Carter Jr.” by “Carter” instead of “Jr.”, place a nonbreaking space
between “Carter” and “Jr.” (To insert a nonbreaking space, choose
Type > Insert White Space > Nonbreaking
Space.)
-
Create a new entry from an existing one
Often, a subject you’re indexing appears in multiple places in a document or book. When this happens, you can create multiple index entries based on other entries already in your index to ensure consistency.
- In the document window, click an insertion point, or select text where the index marker will appear.
- In the Index panel, select Reference, and scroll the preview area to the entry you want to copy.
- Do one of the following:
-
Drag an entry to the New button
 to
insert an index marker at the insertion point, or at the beginning
of the selection.
to
insert an index marker at the insertion point, or at the beginning
of the selection. -
Select an entry in the panel preview area, and then hold down Alt (Windows) or Option (Mac OS) and click the New Entry button. The New Page Reference dialog box appears, with information about the selected entry. Make any changes, and then click Add or OK.
-
Alternatively, you can create a topic list, and then select topics from the list as you create index entries.
Index every occurrence of a word automatically
Using the Add All option is an effective way to index all occurrences of a specified term in a document or a book. When you click Add All, InDesign creates index markers at every occurrence of the words selected in the document—not the text specified in the dialog box. (You can later delete entries that point to less significant information.)
When searching for occurrences of the selected text, InDesign considers only whole words, and searches are case-sensitive. For example, if cheetah is selected, cheetahs and Cheetah will not be indexed.
- In the document window, select the text you want to search for.
- In the Index panel, select Reference.
- To create index entries for any open documents in the book, select Book.
- Choose New Page Reference in the Index panel menu.
- Choose Add All. InDesign adds index markers to all text that matches the selected text, regardless of whether the text has been indexed, so you may end up with multiple entries for the same word or phrase.
Edit an index entry
To change a topic (such as renaming it or applying a new sort order) and automatically update all entries that use that topic, use the Index panel in Topic mode. To change one entry at a time, use Reference mode. In Reference mode, you can also add cross‑references or locate the index marker associated with a page reference.
- Open the document containing the index entries.
- In the Index panel, do one of the following:
-
Select Topic to edit a topic and automatically update all entries using that topic.
-
Select Reference to edit an individual entry.
-
- In the preview area, select an entry or page reference. To select a page reference, select the page icon below the entry.
- Double-click an entry or page reference to edit.
- Edit the entry, and then click OK.