

Crop or mask objects
Cropping and masking are both terms that describe hiding part of an object. In general, the difference is that cropping uses a rectangle to trim the edges of an image, and masking uses an arbitrary shape to make an object’s background transparent. A common example of a mask is a clipping path, which is a mask made for a specific image.
Use graphics frames to crop or mask objects. Because an imported graphic is automatically contained within a frame, you can crop or mask it immediately without having to create a frame for it. If you haven’t created a frame for an imported graphic manually, the frame is automatically created at the same size as the graphic, so it may not be obvious that the frame is there.
- To crop an imported image or any other
graphic already inside a rectangular frame, click the object using
the Selection tool
 and
drag any handle on the bounding box that appears. Press Shift as
you drag to preserve the frame’s original proportions.
and
drag any handle on the bounding box that appears. Press Shift as
you drag to preserve the frame’s original proportions.
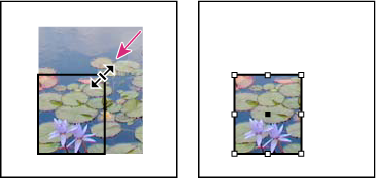 Cropping an image using a graphics frame
- To crop or mask any object, use the Selection or Direct
Selection tool
 to select
one object you want to mask. Choose Edit > Copy, select
an empty path or frame smaller than the object, and choose Edit >
Paste Into.
to select
one object you want to mask. Choose Edit > Copy, select
an empty path or frame smaller than the object, and choose Edit >
Paste Into.
 With an imported graphic, you can also create
a mask by using the drawing tools to change the shape of the graphic’s
existing frame.
With an imported graphic, you can also create
a mask by using the drawing tools to change the shape of the graphic’s
existing frame.