


Insert glyphs and special characters
A glyph is a specific form of a character. For example, in certain fonts, the capital letter A is available in several forms, such as swash and small cap. You can use the Glyphs panel to locate any glyph in a font.
OpenType fonts such as Adobe Caslon™ Pro provide multiple glyphs for many standard characters. Use the Glyphs panel when you want to insert these alternate glyphs in your document. You can also use the Glyphs panel to view and insert OpenType attributes such as ornaments, swashes, fractions, and ligatures.
 Insert a glyph from a specified font
- Using the Type tool, click to place the insertion point where you want to enter a character.
- Choose Type > Glyphs to display the Glyphs panel.
- To display a different set of characters in the Glyphs
panel, do any of the following:
-
Select a different font and type style, if available. From the Show menu, choose Entire Font. Or, if you selected an OpenType font, choose from a number of OpenType categories.
-
Choose a custom glyph set from the Show menu. (See Create and edit custom glyph sets.)
-
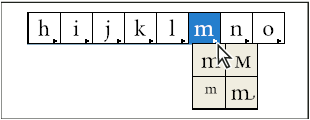
- Scroll through the display of characters until you see the glyph you want to insert. If you selected an OpenType font, you can display a pop‑up menu of alternate glyphs by clicking and holding the glyph box.
- Double-click the character you want to insert. The character appears at the text insertion point.
Insert a recently used glyph
InDesign tracks the previous 35 distinct glyphs you inserted and makes them available under Recently Used in the first row of the Glyphs panel (you have to expand the panel to see all 35 glyphs on the first row).
 Do one of the following:
-
Double-click a glyph under Recently Used.
-
Choose Recent Glyphs on the Show list to display all recently used glyphs in the main body of the Glyphs panel, and then double-click a glyph.
Clear recently used glyphs
- To clear a selected glyph from the Recently Used section, right-click (Windows®) or Control-click (Mac OS) a glyph in the Recently Used section, and then choose Delete Glyph From Recently Used.
- To clear all recently used glyphs, choose Clear All Recently Used.
Replace a character with an alternate glyph
When a character includes alternate glyphs, it appears in the Glyphs panel with a triangle icon in the lower right corner. You can click and hold the character in the Glyphs panel to display a pop-up menu of the alternate glyphs, or you can display alternate glyphs in the Glyphs panel.
- Choose Type > Glyphs to display the Glyphs panel.
- Select Alternates For Selection from the Show list.
- Using the Type tool, select a character in your document.
- Do one of the following to replace the selected character
in the document:
-
Double-click a glyph in the Glyphs panel.
-
Select a glyph on the menu.
-
Display OpenType glyph attributes in the Glyphs panel
For easy selection, the Glyphs panel allows you to display characters for only the selected OpenType attributes. You can select various options from the Show menu in the Glyphs panel.

- In the Glyphs panel, choose an OpenType font from the font list.
- Choose an option from the Show menu.
The options displayed vary depending on which font is selected. For information on applying OpenType font attributes, see Apply OpenType font attributes. For more information on OpenType fonts, see www.adobe.com/go/opentype.