

Create ruler guides
Ruler guides are different from grids in that they can be positioned freely on a page or on a pasteboard. You can create two kinds of ruler guides: page guides, which appear only on the page on which you create them, or spread guides, which span all pages and the pasteboard of a multiple-page spread. You can drag any ruler guide to the pasteboard. A ruler guide is displayed or hidden with the layer on which it was created.
New ruler guides always appear on the target spread. For example, if several spreads are visible in the document window and you drag a new guide into the window, the new guide becomes visible only on the target spread.
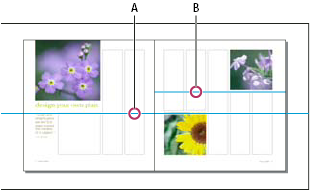
- A.
- Spread guide
- B.
- Page guide
 Create a ruler guide
- Make sure that both rulers and guides are visible, make sure the correct spread is targeted, and view the document in Normal View mode, not Preview mode.
- If the document contains multiple layers, click a layer name in the Layers panel to target the layer.
- Do one of the following:
-
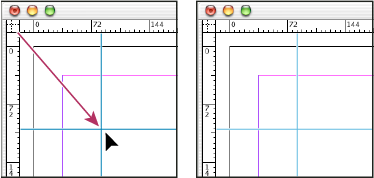
To create a page guide, position the pointer inside a horizontal or vertical ruler and then drag to the desired location on the target spread. If you drop the guide onto the pasteboard, it spans the pasteboard and spread; it will act as a page guide if you later drag it onto a page.
-
To create a spread guide, drag from the horizontal or vertical ruler, keeping the pointer in the pasteboard but positioning the guide at the desired location on the target spread.
-
To create a spread guide when the pasteboard is not visible (for example, when you’ve zoomed in), press Ctrl (Windows) or Command (Mac OS) as you drag from the horizontal or vertical ruler to the target spread.
-
To create a spread guide without dragging, double-click a specific position on the horizontal or vertical ruler. If you want to snap the guide to the nearest tick mark, hold down the Shift key when you double-click the ruler.
-
To create vertical and horizontal guides simultaneously, press Ctrl (Windows) or Command (Mac OS) as you drag from the target spread’s ruler intersection to the desired location.
-
 To reposition a ruler guide numerically, select
the guide and enter values for X and Y in the Control panel.
To reposition a ruler guide numerically, select
the guide and enter values for X and Y in the Control panel.Create a set of evenly spaced page guides
- For Fit Guides To, click Margins to create the guides
within the page margins, or click Page to create the guides within
the page edges.
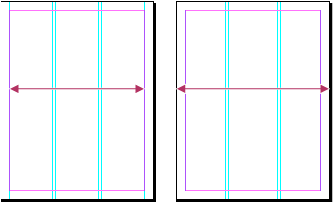 Ruler guides evenly spaced within page margins (left) and page edges (right)
To space
existing guides a uniform distance apart, select the guides (by
dragging or pressing Shift as you click with the mouse). Then, select
Use Spacing from the Control panel, type the space value in the
text box, and press Enter or Return to confirm. Click either Distribute
Horizontal Centers  or
Distribute Vertical Centers
or
Distribute Vertical Centers  to
the left of the Use Spacing option.
to
the left of the Use Spacing option.