

Add movies and sound files to documents
You can add movies and sound clips to a document, or you can link to streaming video files on the Internet. Although media clips cannot be played directly in the InDesign layout, they can be played when you export the document to Adobe PDF or when you export the document to XML and repurpose the tags.
A poster is the image that represents a media clip. Each movie or sound can appear with or without a poster. If the poster in InDesign is larger than the movie, the poster is clipped to the size of the movie in the exported PDF document.
QuickTime 6.0 or later is required to work with movies in InDesign. You can add QuickTime, AVI, MPEG, and SWF movies, and you can add WAV, AIF, and AU sound clips. InDesign supports only 8‑ or 16‑bit WAV files that are not compressed.
Keep track of the media files you add to an InDesign document during the production cycle. If you move a linked media clip after adding it to the document, use the Links panel to relink it. If you send the InDesign document to another person, include any media files you add.
 Add a movie or a sound file
- To change movie, sound, or poster options, double-click
the media object.
 To preview a media file, hold down Alt
(Windows) or Option (Mac OS) and double-click a movie or
sound object using the Selection tool.
To preview a media file, hold down Alt
(Windows) or Option (Mac OS) and double-click a movie or
sound object using the Selection tool. - Export the document to Adobe PDF. Make sure that the
Interactive Elements option is selected in the Export Adobe PDF
dialog box.
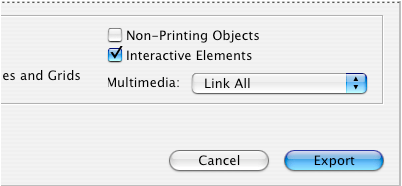 Select Interactive Elements so that media clips can be played in the PDF document.
Link to a movie on the Internet
You may want an object to link to a web URL that plays a streaming media file. After you export the document to Adobe PDF or to a different format, clicking the object plays the movie, if an Internet connection is available.
- If necessary, draw a rectangle to be used as the play area. You can add a poster to this frame later.
- Select an object, and then choose Object > Interactive > Movie Options.
- Click Specify A URL, and then type or paste the URL.
- Click Verify URL And Movie Size to make sure that the URL is valid. (You must have an Internet connection.)
- Specify any other options, and then click OK.
Movie options
You can edit movie options by double-clicking the movie play area using the Selection tool, or by selecting the movie object and choosing Object > Interactive > Movie Options.
- Description
- Type a description that appears if the movie cannot be played in Acrobat. This description also acts as alternative text for visually impaired users.
- Choose A File
- To specify a different movie clip, click the Browse (Windows) or Choose (Mac OS) button next to Choose A File, and then double-click the new filename.
- Embed Movie In PDF
-
Embedding the media file increases the file size of the PDF
document but frees you from having to copy the media file to make
it available to others. This option is not available if Specify
A URL is selected.
You can override this setting
by linking or embedding all media files, or you can use the settings
for each object. Embedded movies require Acrobat 6.0 and later,
or Adobe Reader 6.0 and later.
- Specify A URL
- To play a streaming video from a website, select Specify A URL, and then type or paste the URL.
- Poster
- Specify the type of image that you want to appear in the play area.
- Mode
- Determine whether the movie is played once and then closes (if it’s played in a floating window), played once but stays open, or played in a continuous loop.
- Play On Page Turn
- Play the movie when someone turns to the page of the PDF document on which the movie is located.
- Show Controller During Play
- Display a controller that lets users pause, start, and stop the movie.
- Floating Window
- Play the movie in a separate window. If you select this option, specify the size ratio and position on the screen. Increasing the size of the floating window may reduce image quality. The floating window scale is based on the size of the original movie, not the size of the scaled movie in the document layout.
Sound options
You can edit sound options by double-clicking the sound play area using the Selection tool, or by selecting the sound object and choosing Object > Interactive > Sound Options.
- Description
- Type a description that appears if the sound cannot be played in Acrobat. This description also acts as alternative text for visually impaired users.
- File
- To specify a different sound clip, click the Browse (Windows) or Choose (Mac OS) button next to File, and then double-click the new filename.
- Poster
- Specify the type of image that you want to appear in the play area.
- Play On Page Turn
- Play the sound clip when someone turns to the page of the PDF document on which the sound is located.
- Do Not Print Poster
- Select this option if you do not want the poster to print in InDesign.
- Embed Sound In PDF
-
Embedding the media file increases the file size of the PDF
document but prevents you from having to send or copy the media
file along with the PDF document.
You can
override this setting by linking or embedding all media files, or
you can use the settings for each object. Sounds must be embedded
to be played in some earlier versions of Acrobat.
Poster options
You cannot simply use a placed image as a poster. Instead, specify any of the following types of poster images in the Movie Options or Sound Options dialog box:
- None
- Shows no poster for the movie or sound clip. This option is useful if you want the movie or sound clip to not be visible on the page. For example, you may want the media to be played only when you turn the page, or you may want a more complex design beneath the movie to show instead of the poster.
- Standard
-
Displays a generic movie or sound poster that isn’t based
on the contents of the file.
To use a different
standard poster, save an image as StandardMoviePoster.jpg or StandardSoundPoster.jpg,
and replace the existing file of the same name. (Use the system
search utility to locate the existing poster files.)
- Default Poster
- Displays the poster image packaged with the movie file. If the selected movie doesn’t have a frame designated as the poster, the first frame of the movie is used as the poster image.
- Choose Image As Poster
-
Lets you select an image to use as the poster. Click Browse,
and then double-click the image you want to use. You can select
bitmap graphics, not vector graphics, for posters.
To
use an image as a poster, you can also use the Direct Selection
tool to select the poster frame, and then use the Place command
to place a graphic inside the frame.
- Choose Movie Frame As Poster
- Lets you select any video frame to use as the poster image. Supported formats include AVI, MPEG, MOV, and SWF. Drag the slider or use the arrow keys to advance through the movie clip to the desired frame, and then click OK.