

Position a custom-positioned anchored object
Note the following when using the Anchored Object Options dialog box to position custom-positioned anchored objects.
-
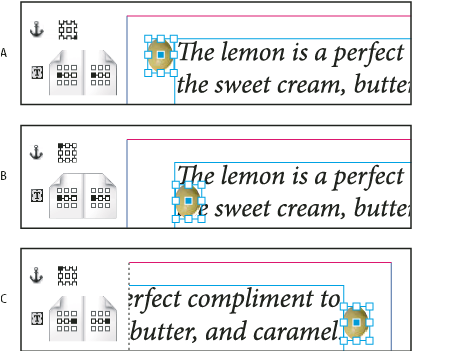
The custom position options include four main options: The two Reference Point proxies and the X and Y Relative To menus. These options all work together to specify the object’s location. For instance, what you choose for X Relative To and Y Relative To determines what the Anchored Position Reference Point represents—it could be a text frame, a text line within a column, or an entire page. The following image represents how you can change the location of the object by choosing a different reference point while leaving the X and Y Relative To options unchanged.
 Changing the location of the anchored object (X Relative To set to Text Frame; Y Relative To set to Line (Baseline))
- A.
- Choosing the lower right point on the Anchored Object proxy and left center point on Anchored Position proxy.
- B.
- Changing Anchored Object proxy point to upper left corner and leaving the Anchored Position proxy point at center left
- C.
- Leaving the Anchored Object proxy at top left and changing Anchored Position proxy point to center right
-
To create an anchored object that maintains its position on the page (such as the top left corner) as text reflows and moves only when the text reflows to another page, anchor the object to the page margins or page edges. For example, set both X Relative To and Y Relative To to Page Margin, click the top left reference point for the object
 and
the top left reference point for the page item . As
the text reflows, the object remains in the top left corner, within
the page margins. Only when the text line containing the anchor
flows to another page does the object move—to the top left corner
of the next page.
and
the top left reference point for the page item . As
the text reflows, the object remains in the top left corner, within
the page margins. Only when the text line containing the anchor
flows to another page does the object move—to the top left corner
of the next page.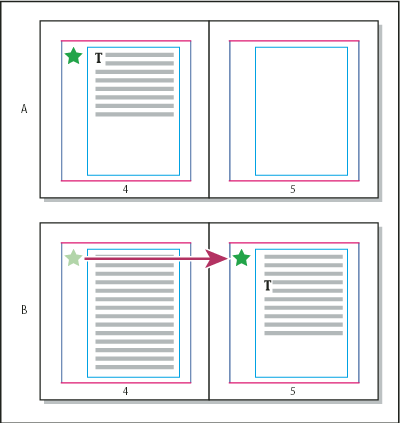 Positioning anchored object to a specific location on the page
- A.
- Position object using use Page Margin or Page Edge for X and Y Relative To
- B.
- When text reflows, object does not follow text until text moves to another page.
-
To keep the object aligned with a specific line of text so that the object stays with that text when it reflows, choose a Line option from the Y Relative To menu.
-
To keep the object within the text frame, but not with a specific line of text when text reflows, choose Text Frame from the X Relative To menu.
-
To align the object relative to the margin (for example, to create a sidebar that stays in the outside margin as the text reflows from page to page), select Relative To Spine.
- From the Position menu, choose Custom.
 To see the object move on the page as
you specify options, select Preview at the bottom of the dialog
box.
To see the object move on the page as
you specify options, select Preview at the bottom of the dialog
box. - Click the point on the Anchored Object Reference Point
proxy
 that
represents the point on the object that you want to align to the
page.
that
represents the point on the object that you want to align to the
page. - Click the point on the Anchored Position Reference Point
proxy that
represents where within the page items chosen from the X and Y Relative
To menus that you want to align the object.