InDesign

Create placeholders for automatic layout

Create placeholder frames or tables in your document when you want InDesign to automatically merge imported XML into your layout.

Note: InDesign flows merged XML content into existing frames only. Any content that doesn’t fit in the frames provided becomes overset text.

You can also create placeholder text to ensure XML data is placed and formatted correctly on the page. Placeholder text can also be used to include tabs, spacing, or labels (called static text), between the XML elements that will appear in a frame.
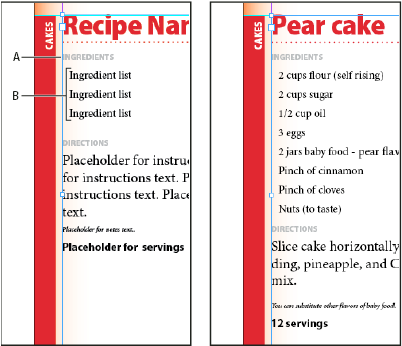
Tagged placeholder text (left) and layout after import (right)

A.
Returns and static text added between elements

B.
Placeholder text

For example, if you are importing and placing product information, you can separate the name, description, and price of the product with a tab, and include labels such as “Product:” or “Price:” before the placeholder text entries for those elements. When XML data is merged into the frame, static labels, spacing, and tabs are preserved between the content elements.

Note: If you merge repeating XML data into your document and instruct InDesign to clone repeating elements, the static text and spacing are also cloned for each instance of the data.

Create a placeholder frame

  1. Using the Type tool, create a text frame for the XML content.
    If you want imported XML content to flow from one frame to another, create multiple frames and thread them together.
  2. Open the Structure pane (View > Structure > Show Structure) and the Tags panel (Window > Tags).
  3. If the Tags panel does not contain tags with names identical to the XML elements you plan to import, create the tags or load the tags from the XML file.
  4. Tag the placeholder frame with the appropriate tag from the Tags panel. (When you tag a frame, any frames threaded to it are assigned the same tag.)
  5. If necessary, arrange or add elements in the Structure pane to match the elements and structure of the XML you will be importing.

Create a placeholder table

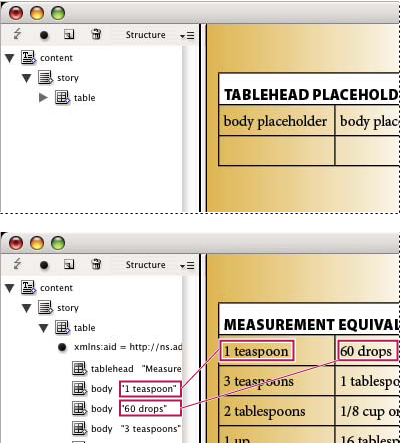
You can import XML elements into a placeholder table as well as a placeholder frame. In a table, each cell is represented by an element. InDesign places XML content into the table cell by cell, element by element, starting from the top left corner of the table, matching the element to the tagged cell. When creating placeholder tables, you must tag the table as well as each cell in the table. (Merged cells are considered a single cell.)

Because InDesign doesn’t distinguish between rows and columns when importing, the number of columns in the placeholder must match the number of columns in the imported content. Also, all the table cell elements must be contained within a single table element. In other words, the cells are all sibling elements under the same parent.

Placeholder table (above) and flow of XML content into placeholder table (below)

  1. Open the Tags panel (Window > Tags) and the Structure pane (View > Structure > Show Structure).
  2. If the Tags panel doesn’t contain tag names identical to the names of the XML table elements you plan to import, either load tags from an existing document or create the tags.
    Note: At a minimum you must have tags for the parent element of the table cells, the table cells, and the element in which the table will reside.
  3. Create a table containing the appropriate number of columns for the XML content. You don’t need to create the exact number of rows, as InDesign will add rows to the table if needed.
  4. With an insertion point in the table, choose Table > Select > Table, and select the appropriate tag in the Tags panel.
  5. Tag each cell of the table with the desired tag. Depending on the structure of your XML content, you can either select and tag the cells individually, or you can select an entire row or column—for example, if you want to tag the first, or heading row—and tag all the selected cells using the same tag.
  6. As necessary, rearrange and add elements in the Structure pane so that your document has the same elements and structure as the XML file you will import.

Create placeholder structure for repeating data

The same rules for merging XML also apply when merging repeating XML: The structure of the elements in the Structure pane must parallel the structure of the imported XML data, and any placeholder frames must be tagged with the same tag names as the parent elements in the XML file.
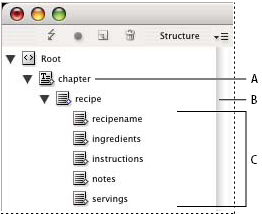
Structure pane showing structure of placeholder text

A.
Element that will contain all repeated elements

B.
Element that will be cloned as repeating XML content is imported

C.
Child elements for data contained in the repeating element

  1. First, you will need a parent or root element that describes the collection of information, or records, you will import.

    For example, a Chapter element that will contain a series of recipes.

  2. Under that parent, create one element that describes the information (or record) that will repeat.

    For example, under the Chapter element, you might create a Recipe element. This is the element that will be cloned for each record in the imported XML.

  3. Under this element, create child elements to describe the units of information (or fields) that make up the record.

    For example, under the Recipe element, you might create Recipename, Ingredients, Instructions, Notes, and Serving elements.

To include labels, returns, or tabs between “field” elements in the repeating XML data, create placeholder elements in the frame the imported content will be merged into. And add spacing or labels as needed between the placeholders.

Create placeholder text

  1. Open an existing document, or create a new document for the XML.
  2. Open the Tags panel (Window > Tags) and the Structure pane (View > Structure > Show Structure).
  3. Make sure the Tags panel contains tag names that are identical to the names of elements you will import with the XML file, and create new tags or load the necessary tags if necessary.
    Importing a sample of the XML content is the easiest way to obtain all the necessary tags and to ensure that the document structure matches the XML file.
  4. Create placeholder frames (and thread them together) as needed for your XML content.
  5. Using the Text tool, click in the first frame to create an insertion point, and type placeholder text for each element you want to merge into that frame. Include any spacing you want between elements, as well as any static text.
    Note: If you will be importing repeating data, you only need to create one instance of sample text for the elements that will repeat.
  6. Format the text as you want it to appear in the final document.
  7. Tag the text frame with the tag for the parent element that will contain the elements (or repeating data) you want to import into that frame.
  8. Position the insertion point in the placeholder text and choose Edit > Edit In Story Editor.
  9. Choose View > Structure > Show Tag Markers.
  10. Choose Edit > Select All.
  11. In the Tags panel, select Add Tag, and then click the tag you assigned to the frame.

    InDesign wraps the placeholder text with the tag, and adds the element to the Structure pane.

  12. Select the text representing the first child element and click its tag in the Tags panel. Repeat until you have tagged all the child placeholder text.
    Important: When tagging placeholder text, do not select any spacing or static text you want to keep between elements. Tag only the text you want replaced with XML content.
  13. In the Structure pane, review the hierarchy created by your tagging to ensure it matches the structure of the XML content you will import.