


Create nested styles
You can specify character-level formatting for one or more ranges of text within a paragraph. You can also set up two or more nested styles to work together, one taking over where the previous one ends. For paragraphs with repetitive and predictable formatting, you can even loop back to the first style in the sequence.
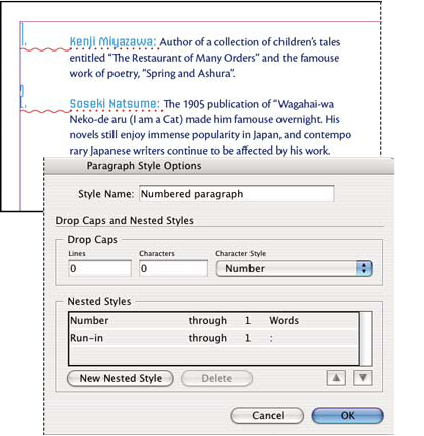
Nested styles are especially useful for run-in headings. For example, you can apply one character style to the first letter in a paragraph and another character style that takes effect through the first colon (:). For each nested style, you can define a character that ends the style, such as a tab character or the end of a word.
 Create one or more nested styles
- Create one or more character styles that you want to use to format text.
- Do one of the following:
-
To add nested styles to a paragraph style, double-click the paragraph style, and then click Drop Caps and Nested Styles.
-
To add nested styles to a single paragraph, choose Drop Caps and Nested Styles from the Paragraph or Control panel menu.
Note: For best results, apply nested styles as part of paragraph styles. If you apply nested styles as local overrides to a paragraph, subsequent editing or formatting changes in the nested style can produce unexpected character formatting in the styled text.
-
- Click New Nested Style one or more times.
- Do any of the following for each style, and then click OK:
-
Click the character style area, and then select a character style to determine the appearance of that section of the paragraph.
-
Specify the item that ends the character style formatting. You can also type the character, such as a colon (:) or a specific letter or number. You cannot type a word.
-
Specify how many instances of the selected item (such as characters, words, or sentences) are required.
-
Choose Through or Up To. Choosing Through includes the character that ends the nested style, while choosing Up To formats only those characters that precede this character.
-
Select a style and click the up button
 or
down button
or
down button  to
change the order of the styles in the list. The order of the styles
determines the order in which the formatting is applied. The formatting
defined by the second style begins where the formatting of the first
style concludes. If you apply a character style to the drop cap,
the drop-cap character style acts as the first nested style.
to
change the order of the styles in the list. The order of the styles
determines the order in which the formatting is applied. The formatting
defined by the second style begins where the formatting of the first
style concludes. If you apply a character style to the drop cap,
the drop-cap character style acts as the first nested style.
-
Loop through nested styles
You can repeat a series of two or more nested styles throughout a paragraph. A simple example would be to alternate red and green words in a paragraph. The repeating pattern remains intact even if you add or remove words in the paragraph.
- Click New Nested Style again, choose [Repeat] in the
character style area, and specify how many nested styles will be
repeated.
In some cases, you may want to skip the first style or styles. For example, an events calendar paragraph may include “This Week’s Events” followed by days of the week and their events. In this case, you could create five nested styles: one for “This Week’s Events,” one each for the day, event, and event time, and a final style with a [Repeat] value of 3, thereby excluding the first nested style from the loop.
Nested style character style options
To determine how a nested character style ends, select any of the following:
 If you don’t
want the character to be included in the nested style formatted, choose
Up To instead of Through when you define the nested style.
If you don’t
want the character to be included in the nested style formatted, choose
Up To instead of Through when you define the nested style.- Sentences
- Periods, question marks, and exclamation marks indicate the end of a sentence. If a quotation mark follows the punctuation, it is included as part of the sentence.
- Words
- Any space or white space character indicates the end of a word.
- Characters
-
Any character other than zero-width markers (for anchors,
index markers, XML tags and so on) is included.
Note: If you select Characters, you can also type a character, such as a colon or a period, to end the nested style. If you type multiple characters, any of those characters will end the style. For example, if your run-in headings may end with a hyphen, colon, or question mark, you can type -:? to end the nested style ends where any of these characters appears.
- Letters
- Any character that does not include punctuation, white space, digits, and symbols.
- Digits
- The Arabic numerals 0–9 are included.
- End Nested Style Character
- Extends the nested style up to or through the appearance of the End Nested Style character you insert. To insert this character, choose Type > Insert Special Character > Other > End Nested Style Here.
- Tab Characters
- Extends the nested style up to or through the tab character (not the tab setting).
- Forced Line Break
- Extends the nested style up to or through the forced line break. (Choose Type > Insert Break Character > Forced Line Break.)
- Indent To Here Character
- Extends the nested style up to or through the Indent To Here character. (Choose Type > Insert Special Character > Other > Indent To Here.)
- Em Spaces, En Spaces, or Non-breaking Spaces
- Extends the nested style up to or through the space character. (Choose Type > Insert White Space > [space character].)
- Inline Graphic Marker
- Extends the nested style up to or through an inline graphic marker, which appears where an inline graphic is inserted.
- Auto Page Number / Section Marker
- Extends the nested style up to or through the page number or section name marker.