

Set column width
You can set a column to a specific width or make it stretch to fill as much of a browser window as possible (autostretch). You can also specify a minimum width for a column using a spacer image.
The first time you insert a spacer image, you set up a spacer image for the site. You can set preferences for spacer images.
Making a column autostretch before your layout is complete might have unexpected effects on table layout. To prevent columns from growing wider or narrower, create your complete layout before making a column autostretch, and use spacer images when making a column autostretch. (However, if each column contains other content that will keep the column at the desired width, you don’t need spacer images.)
If you see two numbers for a column’s width, then the column width set in the HTML code does not match the column’s apparent width on the screen. You can make the width specified in the code match the visual width.
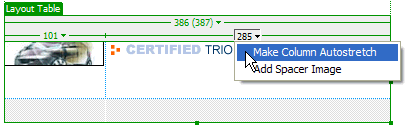
 Make a column autostretch
- Do one of the following:
-
Click the column header menu and select Make Column Autostretch.
-
Select a cell in the column by clicking an edge of the cell, and select Autostretch in the Property inspector.
Note: You can make only one column in a given table autostretch.
-
Set a column to a fixed width
 Do one of the following:
 -
Click the column header menu, and then select Make Column Fixed Width. Make Column Fixed Width specifies a width for the column (in the code) that matches the current visual width of the column.
-
Select a cell in the column by clicking an edge of the cell, then select Fixed and type a numeric value in the Property inspector. If you enter a numeric value that is less than the width of the column’s content, Dreamweaver sets the width to match the width of the content.
The width of the column appears at the top or bottom of the column.
Insert a spacer image into a column
If you’re making a column autostretch, you can choose whether to use a spacer image, and which spacer image to use. The image is not visible, but the column might shift slightly and a double bar appears at the top or bottom of the column to indicate that it contains a spacer image.
-
Click
the column header menu, then select Add Spacer Image.

Remove a spacer image from a single column
Click the column header menu and
select Remove Spacer Image.
Remove all spacer images from a table
Do one of the following:-
Click the table header menu and select Remove All Spacer Images.
-
Select the table and click Remove All Spacers in the Property inspector (Window > Properties)
 .
.
