

Create a Spry region
The Spry framework uses two types of regions: one is a Spry Region that wraps around data objects such as tables and repeat lists, and the other is a Spry Detail Region that is used in conjunction with a master table object to allow dynamic updating of data on a Dreamweaver page.
All Spry data objects must be enclosed in a Spry Region. (If you try to add a Spry data object before adding a Spry region to a page, Dreamweaver prompts you to add a Spry region.) By default, Spry regions are in HTML <div> containers. You can add them before you add a table, add them automatically when you insert a table or repeat list, or you can wrap them around existing table or repeat list objects.
If you are adding a detail region, typically you add the master table object first and select the Update Detail Regions option. The only value that is different and specific for a detail region is the Type option in the Insert Spry Region dialog box.
- Select Insert > Spry >
Spry Region.
 You can also click the Spry Region button
in the Spry category in the Insert bar.
You can also click the Spry Region button
in the Spry category in the Insert bar. - To replace the placeholder text with dynamic data, use
one of the following methods:
-
Drag one or more elements from the Bindings panel on top of the selected text.
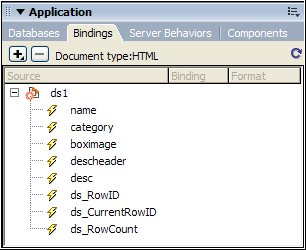
Note: In the Bindings panel, there are some built-in Spry elements, ds_RowID, ds_CurrentRowID, and ds_RowCount, also listed. Spry uses these to define the row in which a user clicked when determining how to update dynamic detail regions. -
In Code view, type the code for one or more elements directly. Use this format: {dataset-name::element-name}, as in {ds1::category}. or {dsProducts::desc}. If you are only using one data set in your file, or if you are using data elements from the same data set that you defined for the region, you can omit the data set name and simply write {category} or {desc}.
Regardless of which method you use to define the contents of your region, the following lines are added to your HTML code:
<div spry:region="ds1">{name}{category}</div> <div spry:region="ds2">{ds1::name}{ds1::descheader}</div> -